Introduction
New instances of each level are created within the level design tool. The
levels themselves are defined in the level administration tool.
This definition has to occur first before a particular instance of a level
can be added. Each instance of a level represents a clinical level. For
example, projects or studies are common levels.
The level design tool is found in the study design area under the level design icon.
Level design consists of the following functions:
- Adding a new level
- Deleting an existing level
- Coping and pasting levels
- Updating attributes of a level
Adding A New Level
The levels are managed in a flow diagram. Adding a new level is
accomplished by left mouse clicking on the object under which a new level will be added as
a sub level. The mouse click will pop up a menu as shown here:

Once the Add Sub-Level is selected and clicked, a new dialog box will appear
as shown here:
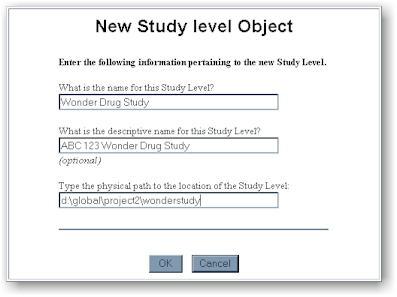
Type a name and a description for this new object. If this is the last level
within the hierarchy, it is required that the name be unique since this will be a key
field for proper study selection. The path to the location of this level will store
files to manage the objects.
Deleting Levels
From the main level design dialog box, left mouse click on the object which needs
to be deleted. Click on the Delete Current Level item from the pop-up menu.
This will delete the current object and all items underneath its hierarchy.
It is important that this is verified since all information pertaining to the object will
be deleted. Only administrators are allowed to delete items since it can have a
significant impact.
Copying and Pasting Levels
The attributes from one level can be copied to a new level through the copy/paste
facility. This can save time when setting up object attributes which may be
similar. The objects copied include:
- Reports
- Programs
- Data
- Dependency
Note that the attributes of these copied objects need to be updated to reflect the new
locations once they are pasted. One example which needs updating is the path
attribute. This newly pasted object's path is different from the original source.
Follow these steps to have a level copied properly.
- Create a physical directory where the new level will reside if it has not been done
already.
- From the main level design, click on the level which is being copied and select the menu
item: Copy Current Level.
- Click on a different level which is at the parent generation of the source and select
the menu item: Paste as Sub-Level.
- Enter valid information in the next dialog box as shown here:
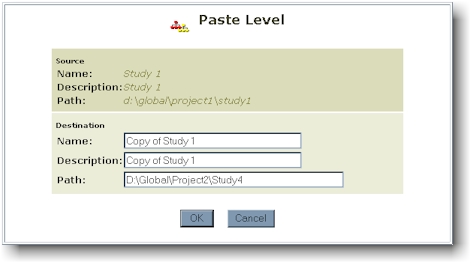
Note that the new path corresponds to the path of the new destination established in step
1. Click on the OK button to accept the update.
A new level has been added with the attributes from the copied level.
Updating Attributes
From the main level design dialog box, left mouse click on the object of
interest. Click on the Properties item from the pop-up menu. The
following dialog box will be displayed showing the attributes of the selected object:

Modifications to the specified object attributes can be accomplished by typing the new
values and clicking the OK button. The attributes of objects within the
level can be edited by selecting the object's pull down menu and then clicking on the Edit...
button. This allows for the editing of the report, program and data attributes. |