Overview
The metadata used in the data definition is automatically
captured by retrieving the information from the dataset
attributes. The data may go through changes so these updates
have to be reflected in the documentation. Besides
information found as attributes to the dataset, additional
comments and source information needs to be edited. There
are tools such as the get categorical to automate the population
of the comments but it is also up to the user to type in some of
these values. This is accomplished through the Edit
Definition screen which can be accessed through the edit
button from the main screen.

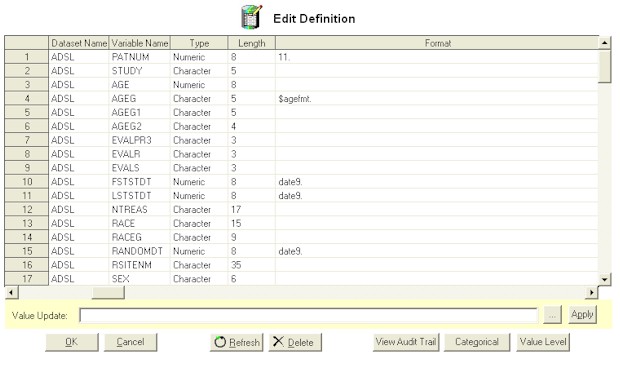
Edit Definition
Attributes
All the attributes used to generate the definition
documentation are displayed in the edit definition screen. The
fields that pertain to the entire dataset are captured within the
first row for each dataset. If the data is changed and
therefore the attributes are changed, then a refresh needs to be
applied. The basic steps towards editing the attributes are
shown here:
- Select an attribute by selecting the field to be edited.
- Edit the attribute directly or enter the value in the
"Value Update" text entry underneath and click on
the "Apply" button.
- Optionally, click on the [...] button to select recommended
values before applying the update to the values.
- Alternatively, you can select multiple rows or columns and
enter a value in the "Value Update" text entry and
click on the apply button to apply to multiple fields at once.
You can choose to commit the changes by clicking on the OK
button or click on the "Cancel" button to ignore all the
updates to the current session.
Some of the fields will have recommendations listed if you were
to click on the [...] button next to the "Value Update"
field. These include:
- Dataset Name:

The list of existing datasets is displayed on the left while
the recommended standard CDISC domain dataset names are listed
on the right. Only one value can be selected.
- Variables:

The list of existing variables is displayed on the left while
the recommended standard CDISC variable names are listed on
the right. Only one value can be selected.
- Dataset Label:

The list of existing dataset labels is displayed on the left
while the standard CDISC dataset labels are listed on the
right. Only one value can be selected.
- Variable Labels:

The list of existing variable labels is listed on the left
while the standard recommended CDISC variable labels are
listed below. Only one value can be selected.
Editing Value Level
Metadata
Value level metadata captures specified metadata that and
associated values of the selected variable. You can select a
specified variable to contain value level metadata by scrolling
over to the column labeled "Value Level Metadata".
You can have the following options in assignment of this column.
- Missing or No - A missing value or a value of
"No" will indicate that there is no value level
metadata to be captured and generated in the final
documentation.
- Yes - A value of "Yes" indicates that the
variable corresponding to the row is going to contain value
level metadata.
- Variable Name - If another variable name is selected,
this indicates that a nested of sub variable will be assigned
and will therefore have the corresponding values of the nested
variables be the value level metadata.
The assignment of the value level metadata can be specified by
first selecting the corresponding cell in the "Edit
Definition" screen and then clicking on the "..."
button to the right of the "Value Update" entry.
In this case, the "Yes" or list of sub variables can be
selected from a list.
Once the specified variable has been assigned to contain a
value level metadata, attributes of the value level metadata can
be assigned through the "Value Level" button from the
"Edit Definition" screen.
 You
can perform the following tasks from this screen.
- Edit Values - Users can edit by typing the value in
the cell entry or through the "Value Update"
entry. The "..." button will also help select
default values.
- Export Excel - Export all values of attributes to an
Excel spreadsheet. Note that in this case, you may need
to click on the OK button to save changes before exporting all
the correct data.
- Import - Import the updated data in the Excel file.
- Refresh - Refresh the latest set of attributes to
reflect all variables that has been specified as value level
metadata.
Refreshing Definition
When the physical SAS Dataset is not in sync with the
attributes captured by the definition, you can apply a
"refresh". This will compare the variable
attributes such as variable names and labels against what is
currently in the definition. If there is a mismatch, the
refresh will update the definition. The updates will not
update non key fields such as comments and keys. These
"non key" attributes will be edited by the user and
therefore not changed by the refresh process except in the event
where the variable and the associated attributes are deleted.

Audit Trail
All edits to the data definition are captured through an audit
trail. This audit trail is updated when the user clicks on
the OK button to apply updates to the definition. A report
of the audit trail can be generated by clicking on the "View
Audit Trail" button from the edit definition screen.
The report captures all the values that have been updated with a
new status column documenting if they were updated or deleted.
Editing Comments
Comment fields are usually entered as free text from the user.
The comments are usually used to describe how a particular
variable is derived. When a comment is selected and if you
click on the [...] button next to the "Value Update"
field, it will perform a %getcat
which derives categorical values from the selected variable.
This is used as the default value for comments which you can use.
Capturing
Categorical Variables
Categorical variables are usually character variables which
contain a small set of distinct values. It is common to have
these values displayed in the comment fields. You can
therefore derive these values in two ways.
- Generate Categorical Values - In the edit definition
screen, if you were to select the comment field of a
categorical variable and select the [...] button, it will
automatically generate a default value listing of all the
categorical values. The result in this case begins with
the text "VALUES:" followed by a list of values
separated by commas.
- Finding Categorical Variables - Clicking on the
categorical button on the edit definition screen will present
the following:
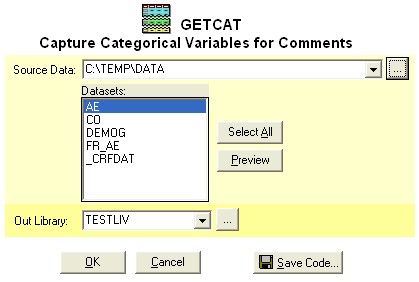
This will allow you to choose all the datasets from the source
location. In addition, a report is generated listing all
the categorical variables and their distinct values. A
macro version of this %getcat
can also be generated through the "Save Code"
button.
Applying Undo
Each time a report is generated through the
"Generate" button or updated through the "OK"
button, a backup of the definition is made. This backup is
stored in a user profile so each user will have their own backup
version. You can therefore apply an undo by clicking on the
"Undo" button from the main screen. This will use
the latest backup version from your user profile and write it to
the _DEFINE dataset which stores the definition.
|